
 Introduction
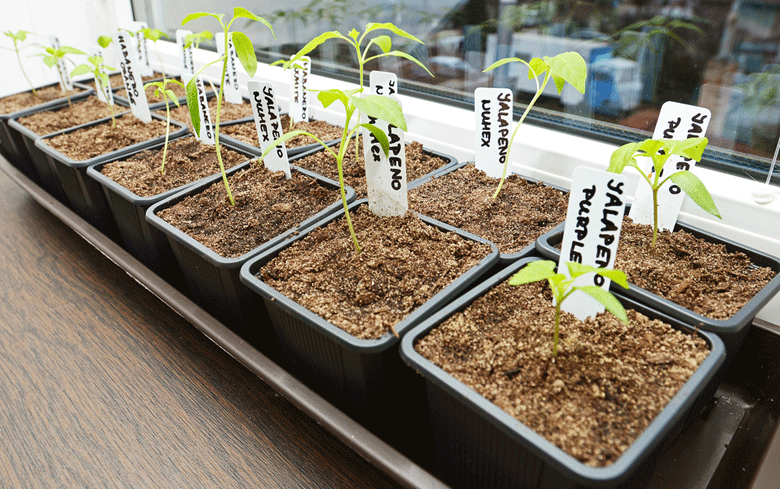
Growing chillies from seed is a rewarding journey that transforms tiny seeds into productive, flavour-packed plants. Whether you’re planning to grow mild varieties like Poblano or face-melting super-hots like the Carolina Reaper, understanding the germination process and early growth stages is crucial for success. This guide walks you through the critical phases of chilli plant development, from the moment the seed awakens to the essential early feeding stages that set the foundation for healthy, vigorous plants. By following these guidelines and providing the right conditions, you’ll be well on your way to growing thriving chilli plants that will reward you with a bountiful harvest.
The journey of growing chillies requires patience and attention to detail,particularly during the crucial early stages. Each tiny seed contains everything needed to produce a healthy plant, but success depends on providing the right conditions at the right time. Understanding the biology behind seed germination and early growth will help you avoid common pitfalls and maximize your chances of raising strong, productive plants. The margin for error during these early stages is small – even minor variations in temperature, moisture, or light can significantly impact development. By mastering these fundamentals and learning to read the subtle signs your seedlings provide, you’ll be better equipped to nurture them through their most vulnerable period of growth.
Whether you’re growing chillies indoors or in a greenhouse, the principles remain the same. The key is to create an environment that mimics the natural conditions these plants have evolved to thrive in. From maintaining consistent moisture during germination to providing adequate light and nutrients as the seedlings develop, each step builds upon the last to create the foundation for healthy, productive plants.
The Initial Awakening
First, the seed absorbs water through its seed coat, causing it to swell. This process, called imbibition, activates enzymes within the seed that begin breaking down stored nutrients in the endosperm. The rate of water absorption can vary depending on the temperature and the age of the seed – fresher seeds typically absorb water more readily than older ones. During this phase, the seed coat becomes softer and more permeable, allowing oxygen to reach the embryo inside. This increased oxygen availability, combined with the activation of enzymes, kicks off a cascade of metabolic processes that will ultimately lead to germination.
Once hydrated, the embryo inside begins to grow. The first visible sign of germination is when the radicle (embryonic root) emerges from the seed coat, pushing downward through the soil. This primary root begins to develop root hairs that will help anchor the seedling and absorb water and nutrients. The development of a strong root system at this stage is crucial for the plant’s future success. The root tip contains specialized cells that can sense gravity, ensuring the root grows downward even if the seed is positioned differently. As the root system develops, it begins establishing beneficial relationships with soil microorganisms that will assist with nutrient uptake throughout the plant’s life.
Next, the hypocotyl (stem) grows upward, forming a hook shape as it pushes through the soil. As it emerges, it pulls the cotyledons (seed leaves) with it. In chilli peppers, the cotyledons are pushed above ground in what’s called epigeal germination. This hook shape of the hypocotyl is a remarkable adaptation that protects the delicate cotyledons as they push through the soil surface. The bent shape acts like a natural plow, making it easier for the seedling to break through even slightly crusted soil surfaces. The timing of this emergence can vary depending on planting depth – seeds planted too deeply will expend more energy reaching the surface and may fail to emerge, while those planted too shallowly might not develop strong enough root systems.
 The final stage
The seed coat falls away as the cotyledons unfold and turn green, beginning photosynthesis to produce energy for further growth. These first leaves are quite different from the true leaves that will develop later – they’re smoother and more oval-shaped. At this crucial stage, it’s essential to provide adequate light – either a sunny windowsill or artificial grow lights positioned close to the seedlings. Without sufficient light, the seedlings will become “leggy,” developing long, weak stems as they stretch towards any available light source. This results in poor plant structure and can lead to weak, unproductive plants. Ideally, provide 14-16 hours of light daily, with the light source just a few inches above the growing tips.
Finally, between the cotyledons, the first true leaves begin to develop from the growing point (apical meristem). These have the more characteristic pointed shape of chilli pepper leaves. At this point, the seedling begins to establish itself as an independent plant, though it may still draw on some nutrients from the cotyledons until they eventually wither and fall off.
Once the nutrients stored in the cotyledons are exhausted, the young seedling becomes completely dependent on external nutrients. This is a critical time when the plant needs appropriate fertilizer. For young seedlings, several diluted fertilizer options work well. Organic options include compost tea (diluted 1:10 with water), worm casting tea (1:10), liquid seaweed solution (1:20), or fish emulsion (1:10, though it can smell strong). Liquid tomato feed is particularly suitable as both tomatoes and chillies are from the same family (Solanaceae) and have similar nutrient requirements – use it at quarter strength initially, gradually increasing to half strength as the plant develops. Chilli Focus is an excellent choice as it’s specifically formulated with the optimal nutrient ratios for chilli plants, though it should still be diluted to quarter strength for young seedlings. Canna Start is another excellent option specifically designed for seedlings and young plants, providing a gentle but complete nutrient profile. Always start feeding when the first true leaves develop, applying fertilizer every 1-2 weeks, and water with plain water between applications. It’s crucial to err on the side of too weak rather than too strong, as young seedlings are very sensitive to fertilizer burn.
Optimal Conditions
The entire germination process typically takes 7-10 days under optimal conditions (warm soil around 80°F/27°C and consistent moisture), though this can vary depending on the specific variety and environmental conditions. Copy