Potting on Chillies

Potting on for success

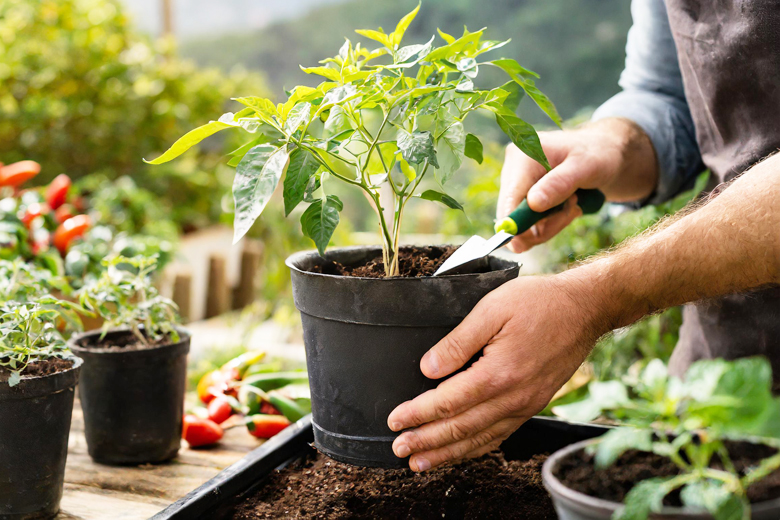
Potting on Chillies  isn’t just a routine task; it’s a strategic process that directly influences the vitality and productivity of your Chilli garden. Each stage of potting on—from the delicate transfer of seedlings to the final placement in larger containers—is carefully orchestrated to provide your plants with the space, nutrients, and support they need to flourish. Understanding these stages ensures you nurture your Chilli plants from their infancy to their full potential, fostering a deeper connection with your garden.

In this guide, we’ll delve into the intricacies of potting on, offering insights into selecting the right pot sizes based on the specific characteristics of your chilli variety. Whether you’re nurturing compact ornamental peppers or cultivating sprawling heirloom varieties, understanding how pot size impacts root development and plant growth is key to success. With our guidance, you’ll be able to tailor your potting strategy to suit the unique needs of your Chilli plants, fostering healthy growth and abundant harvests.

Join us as we explore the importance of potting on at every stage of your Chilli plants’ growth journey. From the early days of seedling development to the exhilarating moments of flowering and fruiting, we’ll equip you with the knowledge and techniques to ensure your Chilli plants thrive and produce a bountiful harvest. With our comprehensive approach, you’ll feel confident and empowered to tackle each potting stage with precision and care, setting the stage for a successful chili-growing experience.

Read more

The best soil for Chillies

The best soil for growing Chillies

Growing chillies involves more than just planting seeds and watering them occasionally. It’s a journey where we nurture them through every phase of their growth, ensuring they have the right conditions to thrive. This includes growing Chillies  in the best soil you can .   The soil they grow in is like their home—it’s where they get their food and support to grow big and strong. As chilli enthusiasts, we’re committed to learning all we can about soil care to give our plants the best chance to flourish.

Once chilli seeds sprout, they go through three main stages of growth: first, they’re delicate seedlings, then they grow a lot of leaves and stems, and finally, they start to flower and make fruit. Each stage is like a different chapter in their story, with its own set of needs. At each stage, they have different requirements , so we have to adjust their soil and pots to meet those needs and help them grow well.

In this guide, we’ll dive deeper into understanding what happens to chilli plants at each stage of growth, what they need to eat to stay healthy, and we’ll provide examples of soil mixes that work best for them. By learning these basics, we can take better care of our chilli plants, ensure they’re happy and healthy, and ultimately, reap the rewards of a bountiful harvest. So, let’s roll up our sleeves and get ready to grow some fantastic chillies! Read more

Bhut Jolokia Chillies

Blisteringly hot

Are you ready to set your taste buds ablaze? Prepare to embark on a fiery journey with one of the hottest chillies known to humankind – the Bhut Jolokia, also commonly spelled as Bhoot Jolokia. Strap in, spice enthusiasts, because we’re diving deep into the realm of intense heat and unmatched flavour!

Originating from the north eastern region of India, particularly Assam, Nagaland, and Manipur, the Bhut Jolokia has earned its stripes as a legendary chilli pepper. It was officially recognized as the world’s hottest chillies by the Guinness World Records in 2007 with an official heat rating of over one million Scoville heat units. It was , a title it held for several years until being surpassed by other contenders – notably the Carolina Reaper

In many cultures, especially in India, it holds significant cultural and medicinal value. Some even believe it possesses therapeutic properties, ranging from pain relief to boosting metabolism.

But don’t let its intimidating reputation scare you off! While the Bhut Jolokia indeed packs a punch with its scorching heat level, it also boasts a unique flavour profile that adds depth and complexity to any dish. Its fruity and smoky notes can elevate everything from curries and salsas to hot sauces and marinades, infusing them with a distinctive warmth that lingers long after the last bite. Typical uses include the following:

Read more

Traditional Greek Salad

Greek Village Salad

The Greek salad, or Horiatiki Salata,” has roots in ancient Mediterranean cuisine, though its exact origin remains unclear. Emerging in the early 20th century, it became a staple dish in Greek households and restaurants, particularly in rural areas abundant with fresh produce. Its ingredients, including tomatoes, cucumbers, onions, bell peppers, olives, and feta cheese, reflect Greece’s agricultural landscape. Feta cheese, with its tangy flavour and crumbly texture, is a quintessential element of Greek salad.

Seasoned with dried oregano and dressed with extra virgin olive oil and red wine vinegar, it enhances the natural taste of the ingredients. Greek salad holds cultural significance, symbolizing Greek hospitality and culture. It’s commonly served as a starter or side dish in Greek meals and enjoyed year-round, especially during the summer months. Its popularity extends globally, found on menus in Greek restaurants worldwide, appreciated for its simplicity, vibrant colours, and fresh flavours.

Furthermore, variations of Greek salad may include additional ingredients such as pickled chillies, which add a spicy kick to the dish, enhancing its complexity and appeal. Overall, Greek salad epitomizes the Mediterranean diet, emphasizing fresh, seasonal ingredients and the importance of olive oil in culinary traditions. Its enduring appeal lies in its ability to evoke the sunny flavours and warmth of Greece, making it a beloved dish enjoyed by many across different cultures.

Read more

Feta Bouyiourdi – Greece

wpseo_breadcrumb]

Baked Feta and Chillies recipe

Baked Feta cheese with chillies and tomatoes
 
Author: 
Nutrition Information
  • Serves: 4
  • Serving size: 200g
  • Calories: 70
  • Fat: 26 g
  • Saturated fat: 16 g
  • Unsaturated fat: 8 g
  • Trans fat: 0 g
  • Carbohydrates: 10 g
  • Sugar: 7 g
  • Sodium: 1114 mg
  • Fiber: 2 g
  • Protein: 15 g
  • Cholesterol: 89 mg
Recipe type: Chillies and cheese
Cuisine: Greek
Prep time: 
Cook time: 
Total time: 
There is a special affinity between Feta and chillies. Chillies like the Banana pepper are stuffed with this cheese and preserved in oil and vinegar, for serving as a dish as part of a the popular Meze table. Another affinity that chillies have with this cheese is that they love being baked, This Greek recipe for spicy Feta is baked with chillies in the oven is exactly along this theme. Kalí órexi !
Ingredients
  • Tomatoes – four medium
  • Feta cheese – two 200 gram blocks
  • Pickled Banana Chillies – two to three ( chopped) see note *
  • Chilli flakes - one tablespoon
  • Olive oil – four teaspoons ( or more according to taste)
  • Oregano – one teaspoon
  • Aluminium foil
Instructions
  1. Cut out the cores from the tomatoes using a sharp knife.
  2. Cut a shallow cross in the skin of each tomato.
  3. Using tongs. blanche each tomato for 10 to 20 seconds in hot water
  4. Once blanched, immediately plunge into ice-cold water ( use ice to make this ) and then immediately remove. This should make it easy to peel the skins.
  5. Peel the skins and discard
  6. Cut the tomatoes in half and remove and discard the seeds
  7. Chop the remaining flesh into dice about 12mm
  8. Chop the feta blocks in half to provide four 100 gram pieces
  9. Chop a 20 gram slice off each block Keep to one side
  10. Cut four pieces of aluminium foil large enough to make parcels that will have their tops scrunched up to cover folded over when the cheese is to be baked.
  11. Place the cheese in the centre of the foil and fold up the sides ( forming the unclosed parcel.)
  12. Spoon equal amounts of the chopped tomato on top of the cheese
  13. Add the chopped banana chillies in equal quantities. (see note)
  14. Crumble the reserved 20-gram slices of feta cheese and sprinkle over the top of the chillies
  15. Sprinkle the chilli flakes and oregano equally over the crumbled cheese
  16. Pour a teaspoon of olive oil ( or more, to personal taste) over the top.
  17. Scrunch up the foil to close the parcels
  18. Bake for 20 to 25 minutes at 180 degrees Celsius. Remove
  19. Turn up the oven to grilling temperature.
  20. Open the tops of the parcels and place under the grill.
  21. Grill until browned ( 2 to 3 minutes)
  22. Serve immediately with pita bread or similar
Notes
* If you are unable to buy pickled banana peppers, any pickled yellow or green chillies will do,

Keywords: Spicy Feta cheese with tomatoes and chillies

Link button


Link to Feta stuffed Chillies recipe


Chillies with Feta cheese

Chillies with Feta cheese

[wpseo_breadcrumb]


Chillies with Feta cheese in oil
Nutrition Information
  • Serves: 12 100g portions
  • Serving size: 100g
  • Calories: 399 kcal
  • Fat: 32
  • Saturated fat: 6.2g
  • Carbohydrates: 6.2g
  • Sodium: 0.5g
  • Fiber: < 0.5g
  • Protein: 4.1g
Recipe type: Chillies in oil
Cuisine: Greek
Prep time: 
Cook time: 
Total time: 
There is a certain magic to the Greek Islands. Overlooking a beautiful beach with the sun shining down and drinking a lovely glass of cold wine with an expertly prepared Mezze platter is one of life’s great pleasures. The Greeks are masters at combining pickled capsicums with their wonderful Feta cheese. This dish is typical of an item you might find as part of a mezze selection. Making it at home will bring some of that Mediterranean magic right to where you are
Ingredients
  • Chillies – 500 grams (Hungarian hot wax or [url:2]similar[/url])
  • Cream cheese – 150 grams
  • Feta Cheese – 250 grams
  • White Wine Vinegar- 1 cup
  • Sugar – ⅓ cup
  • Olive oil – one and a half to two cups (enough to cover Chilies when filled with cheese)
  • Garlic – 3 cloves
  • Dried oregano – 1 teaspoon
Instructions
  1. Cut the stems from the Chillies and remove the white pith and seeds
  2. Wash the Chillies, dry and rest on a paper towel so all moisture is removed
  3. Bring the vinegar and sugar to the boil in a pot or saucepan. Add the Chillies and fill the pot with water until the Chillies are covered. Ensure that the vinegar content is at least 5 %
  4. Cook until tender but still relatively firm
  5. Remove from the heat. Allow to cool and refrigerate for 48 hours
  6. Once the Chillies have become pickled. Remove from the pickling liquid and dry with a paper towel. The pickling liquid can be discarded
  7. Mix the cheeses until well blended.
  8. Sprinkle with oregano
  9. Heat olive oil and add garlic. Cook on a gentle heat for 3- 4 minutes
  10. Remove from heat and allow to cool.
  11. Pipe cheese mixture into Chillies using a piping bag (a spoon can also be used)
  12. Place cheese filled Chillies into sterilized jars. Fill the jars with garlic infused oil, ensuring that the Chillies are completely covered. Seal
  13. Should be refrigerated and used within 7 to 10 days.
Notes
Keywords: Chillies with Feta Cheese


Traditional Greek Salad